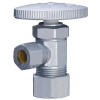
 A compression valve creates a water tight seal with the pipe by squeezing a metal or plastic compression ring against the pipe or tubing. Compression valves are most commonly used in the home as water supply shut off valves, but are also used for other applications.
Tools and Materials required
- 2 adjustable wrenches
- Teflon tape
- Sand cloth
- Compression valve
- Pipe cutter
- Bucket
Installing Or Replacing Compression Valves
- Shut off the water to the area where the valve is located and relieve the water pressure by opening faucets.
- Remove the old valve. Place a bucket under the valve to catch any left over water. If it’s the compression type you will have to cut the pipe just below the old compression ring. For solder type valves cut the water line below the valve.
- Ensure the pipe is smooth, round and free of solder drippings where you plan to install the compression valve to ensure a good seal.
- Clean the end of the pipe with sand cloth, emery cloth or steel wool until there is a clean surface.
- Place the large valve nut over the pipe then the compression ring over the pipe.
- Wrap teflon tape around the threads of the valve in a clockwise motion.
- Seat the valve body on the pipe and slide the compression ring and nut up to it. Make sure the ring is square to the valve before tightening.
- Tighten the nut using two wrenches, one on the nut, and one on the valve body to keep it from moving. Tighten snuggly but don’t over tighten.
- Shut of the valve and test for leaks.