This article will cover all of the steps required to install a standard alcove bathtub and shower combination. If your planning to install your own bathtub and shower there will be a significant amount of carpentry and plumbing work to be preformed so please read the entire article to make sure it’s a project your able to handle.
A bathtub is different from most plumbing fixtures in that it must be chosen prior to the rough-in. The standard size bathtub is 5 feet long by 30 inches wide but there are numerous sizes and styles that can fit your design needs. Bathtubs also come in left and right hand, which means the side the drain is on when looking at the finished side.
Framing The Bathtub Walls
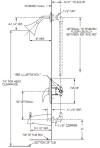
The bathtub will need to be installed snugly between the walls of the rough framing and the measurements must be dead on. Because there are so many different models and sizes, it would be impossible to give specific measurements to follow, but the general rule is to only leave 1/8″ clearance on the length. 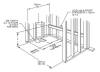 The bathtub’s rim should be touching or very close to all the framing members, or when the drywall is installed it will bow out at the bottom. Click on the thumbnail on the right to see an example for an American standard steel Bathtub.
On the side of framing where the tub’s drain will go, a hole 12″ long by 9″ wide needs to be cut in the floor to allow for the drain and overflow to be connected to the trap. The studs behind the drain side of the bathtub will have to house the shower control and water supplies so leave at least a foot of room between studs in the center for their installation.
A support will need to be installed along the back wall for the bathtub to rest on. You can either use a long horizontal support or cut legs for the bathtub to rest on. Use a level to ensure the support is true.
Bathtub Drain Rough-in
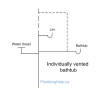
The standard bathtub/shower combination will require an 1-1/2″ drain and p-trap installed to your local plumbing code. The drain must be graded(sloped) at a minimum of 1/4″ per foot and must be vented. This can be done in one of two ways, by wet venting the trap arm fixture drain or by individually venting the bathtub. Below I’ll show you an example of each venting method, but if your concerned about your particular situation, just ask for help on the Forum.
Wet Vent Underground Wet Vent Individual Vent 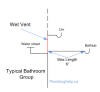

Installing The Bathtub
When your ready to install the bathtub into the alcove, remove the cardboard and save a large piece to line the inside of the tub while your working in or around it.
 Connect the drain and overflow to the bathtub following the manufacturers installation guide; alternatively, detailed instructions can be found in this article “Replacing a bathtub overflow“.
- Ensure gaskets are installed on the outside of the bathtub
- Use plumber’s putty between the bathtub and drain outlet and Teflon tape on the drain outlet threads, tighten with a PO wrench.
When your ready to set the bathtub into position it will help to have a friend lend a hand sliding it into the framing.
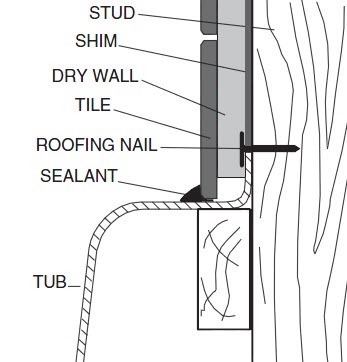
Now you have to level the bathtub. Using wooden shims place a slight grade toward the back wall and ensure along the length is perfectly level. Now you can secure the bathtub to the framing members using large flat headed roofing nails along the rim. Use extreme caution hammering the nails home as the bathtub’s enamel finish will easily chip when struck.
Connecting The Drain
When the bathtub is secured in place it’s time to connect the drain and overflow to the p-trap. Whenever your working with drainage pipes it’s a good idea to cut the pieces to size and dry fit them(no glue) to ensure everything will line up and the drain has the proper grade.
Installing The Shower Control
Shower controls are produced by countless manufactures and each have specific rough-in dimensions that must be followed. There are a few common factors however; such as:
1. Ensure that the shower control valve is mounted on a support brace at the correct distance from the finished wall.
2. Use copper pipe for the bathtub spout even if your using pex for the rest. Brace behind the elbow for the spout.
3. The standard height for the shower head is between 72 and 80 inches from the floor height, however tall people will appreciate a higher shower head. Brace behind the elbow.