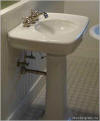
 Pedestal sinks are a popular space saving bathroom fixture and have a unique style. However; if your thinking of replacing your vanity with a pedestal sink, make sure you are willing to lose some countertop space as well as cupboard storage under the sink. Pedestal sinks are usually very affordable to buy and expensive to have installed; because of the way they are designed, measurements must be accurate and the work space is quite confined.
Tools and materials you may require
- Drill
- Wrenches
- Ratchet/Socket
- Level
- Measuring tape
- Screwdriver
- Basin wrench
- Channel lock pliers
- Pipe wrench
- Hacksaw
- 2″ Pipe cutter
- Plumbers putty
- Teflon tape
- Chrome P-trap
- Flexible 3/8″ water supplies
Preparing the area
- If your replacing an existing vanity and drop in sink you will most likely have to repair the wall and flooring before installing the pedestal sink.
-
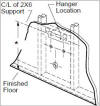 You may have to install structural supports (backing) between the studs to mount the bracket that will support the weight of your new sink. Read the instructions that come with the pedestal sink to find the measurements.
 - Ensure the floor is level where the pedestal will rest.
- If changes to the plumbing must be done now’s the time. The less of the pipes you can see with a pedestal sink the better. The center of the drain should be 18.5″ from the finished floor and the water supplies should be 21.5″ from the floor and 4″ apart centered off the drain.
Installing the pedestal sink
- Read the manufacturers instructions.
- Find the proper height and center to install the bracket for the sink.
- Set up the pedestal and set the sink on top (carefully) to get the horizontal center line for the bracket and mounting bolts. Mark the locations of bolt holes on the wall for the sink, and on the floor for the pedestal.
- If your pedestal is required to be secured to the floor pre-drill with a size smaller drill bit then ratchet down the leg bolts carefully or you can break the porcelain.
- If your pedestal sink came with small cushions for the sink to rest on, use them to level the sink on the pedestal as well.
- Install faucet and drain assemblies on the sink before mounting it on the pedestal. Just hand tighten the trap unions so that you can line it up with the drain after its mounted. Place a small amount of plumbers putty around the tail piece before pushing it down through the sink, as it gets tightened underneath, it will squeeze out and form a water tight seal, discard the used putty.
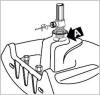
- Place water supply lines on the faucet and tighten them.
- You may need to cut the trap arm or tail piece to match it up with the drain.
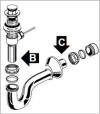
- Set the sink on the pedestal and check the alignment of the drain, then tighten the nuts on the trap.
- Secure the sink to the wall using the provided hardware. Check for level on the sink before tightening the bolts completely.
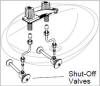
- Connect the water supplies to the shut-off valves and tighten.
- Turn on the water and test for leaks, especially on the chrome p-trap.
- Connect the mechanical plug pivot arm to the faucet lift arm and adjust it with the metal clip to the proper height.