A constantly dipping faucet can be extremely annoying; not to mention a waste of water, but any homeowner can easily and inexpensively can make this repair.
Tools And Materials You May Require
- Adjustable Wrench
- Screwdrivers
- Tap washers
- O-rings
- Cartridge seats
- New cartridge
- Pliers
Removing The Cartridge
- Turn off the water under your sink and open the faucet.
- Using a screwdriver remove the handles of the faucet. Some handles have the screws hidden under a cover plate on top of the handle. You may experience some difficulties removing the handle because of corrosion on the cartridge stem, if this is the case try spraying the screw opening with a little WD-40 or 3in1 oil and let set for 20 min.
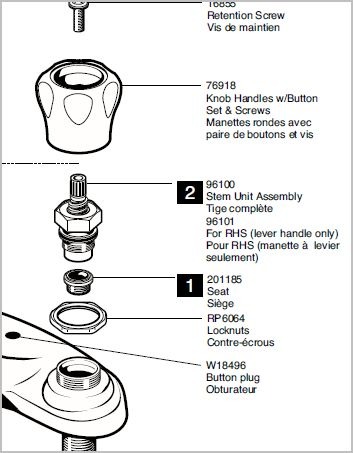
- Use an adjustable wrench to take out the Waltec cartridge.
- Use a screwdriver to remove the old tap washer on the bottom of the cartridge and replace with a new one. If the faucet is leaking around the handle also replace the o-rings. You can purchase these at most plumbing supply stores as well as new complete cartridges.
- The seat in the hole where the cartridge came from can also be replaced if it has ruff edges. To remove this use an allen key and unthread it.
Poor Water Flow Rate
If your faucet does not create the normal stream of water it once did, you can clean or replace the aerator.
- Remove the aerator with a pair of pliers and a rag to protect the finish.
- To clean the aerator run water through it backwards and then soak in vinegar for a couple hours.
- Replace with another aerator the same size.