How A Thermostat Works
 The temperature inside your water heater is controlled by a thermostat, and most residential water heaters are dual thermostat units. Thermostats operate by sensing the temperature inside the tank; and if below the temperature setting, they send power through the element, heating the water. Once the water temperature satisfies the thermostat’s call for heat, it cuts power to the element. Dual thermostat water heaters will either be wired to operate both thermostats simultaneously or non-simultaneously, which means that the upper thermostat will be satisfied first before allowing the lower thermostat to control the lower element.
Since the majority of residential water heaters have non simultaneous thermostats I’ll go over how they operate.
- Tank is filled with cold water – only the top thermostat is sending power to the top element.
- As the top of the tank reaches the proper temperature the thermostat sends power to the lower thermostat and shuts off power to the top element.
- The lower thermostat sends power to the lower element until it reaches the thermostats temperature setting.
- As hot water is used cold water enters the tank at the bottom and the lower thermostat turns on the lower element.
- If enough hot water is used to lower the temperature at the top of the tank the upper thermostat will take over and begin heating the water.
Thermostat Safety Features
 Water heaters are pressure vessels that given the right circumstances can create quite an explosion(Mythbusters YouTube clip). Thermostat’s have built in protection from over heating the water; called a high limit, that will trip and must be manually reset. If the red reset button on the thermostat is popped out it can be pushed in and may put the water heater back in action for a long time or just one heating cycle, but is likely a sign of a problem with the thermostat. Thermostats have a temperature setting that can be manually adjusted but the safe range is 120-140F.
Testing the thermostats
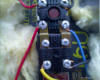
 The following thermostat tests will require leaving the power on and is inherently dangerous. Testing for voltage will determine if the thermostat is faulty but you must also check the water heater’s elements for serviceability using an Ohm meter(resistance). You can click on the image to right to see an example and names of the electrical components in a typical water heater.
- Working with electricity is required for troubleshooting a water heater thermostat. If you lack the knowledge and proper tools to work safely around enough electricity to possibly kill you then stop reading and call a professional.
Testing The Upper Thermostat With The Power On
- Remove the access covers and insulation to expose the thermostats and elements.
- With your multi-meter set to volts AC (read the instructions for how to use your type of meter), check for voltage at the two top terminal of the high limit control. There should be 120, 208 or 240 volts depending on your water heater. Usually 240 volts.
- If no voltage is found turn off the power at the breaker box and physically check the electrical connections to the water heater, making sure all wire nuts are connecting the wire ends.
- With the power on.
- Ensure the reset button is not tripped by pushing it in. Use a pencil eraser, as it does not conduct electricity.
- Turn the upper thermostat to the highest temperature setting and check for voltage at the two upper element screw terminals. It should be 120, 208 or 240 depending on your water heater(look on the electrical plate to find out).
- If no voltage was found the upper thermostat is likely faulty.
Testing The Lower Thermostat
- If the tank is full of cold water the upper thermostat will not allow the lower thermostat to have power and you won’t be able to test it.
- Turn the upper thermostat’s temperature setting to the lowest setting.
- Turn the lower thermostat to the highest temperature setting.
- Check for voltage at the two terminals of the heating element. It should be 120, 208 or 240 depending on your water heater(look on the electrical plate to find out).
- If no voltage is found the lower thermostat is likely faulty.
Replacing A Thermostat
You will have to do a little research to find a thermostat for your model of water heater and the best place to find one is the manufacturer’s website.
- Turn off all power to the water heater and make sure no one will turn it back on.
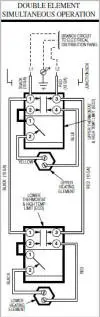
- Take a picture of the way the old thermostat is wired so you can refer to it later, also if you go to the manufacturer’s website they should have a wiring diagram to assist you. You may also want to label the wires with tape to the terminals they went to.
- Use needle nose pliers to remove the wires from the terminal screws. Don’t grab the wires insulated coating with the pliers you may damage it and cause yourself more grief.
- Clips or a bracket may be holding your thermostat in place, remove the thermostat by sliding it out or removing the bracket.
- Clean the surface to ensure the new thermostat will make a good contact with the tank to detect the temperature.
- Replace the thermostat and hook the wires up the way they were(double check).
- Turn on the power and test with a multi meter for proper operation.