If your hot water isn’t as hot as it used to be or your electric bill is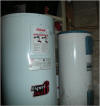 taking a beating, you might want to replace your old hot water tank for a modern energy efficient one. Although this may be a big job for some, it is possible for a homeowner to accomplish with the help of this guide and a few simple tools.
The average life expectancy of a hot water tank is around ten years so if your concerned about your hot water tank leaking then it’s time to replace it, a leak could cost you thousands.
*Plumbing codes vary, always consult your local authority for current code requirements in your area.
Determining Your Hot Water Needs
Most homes use a 40 gallon hot water tank which will supply enough hot water for the average family of four, but if your not the average family the are other options. Here is a general guide:
2 people 30 gallon tank 3-4 people 40-50 gallon tank 5-6+ people 60-80 gallon tank
There are also tankless water heaters available that will only heat the water as there is a demand for it, this can save you money by not keeping a large volume of water hot when it’s not required.
Tools And Materials You May Require
Soldering equipment
Large adjustable wrench
Pipe cutter
Small pipe wrench (14″)
2 Couplings
Pliers
3/4″ pipe (1/2″ pipe if that’s what you have installed already)
Tape measure
3/4″ tee
3/4″ 90 degree elbows x 3-4
3/4″ Male adapter x 1
3/4″ female adapter x 1
Garden hose
Volt meter
Teflon tape
1 x 3/4″ ball valve
Safety – Goggles, gloves, fire extinguisher or bucket of water
Bucket
Multi-tip screwdriver
Rags
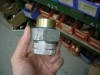
Vacuum breaker
Wire nuts / marrets
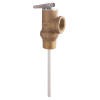 3/4″ Temperature & Pressure relief valve (if not already installed on the tank)
 2 x Dielectric Unions
Removing The Old Hot Water Tank
*Ensure the electrical disconnect or breaker is off and test with a volt meter.
- Turn off the water supply to the tank. You may wish to let the water cool for a couple hours, but it isn’t necessary to.
- Attach a garden hose to the drain at the bottom of the tank and run it to a floor drain. If you don’t have a floor drain you can use a sump pit, laundry tub or bucket by bucket if necessary. I use a small pump that has 3/4″ hose treads on it.
- Start to drain the water by relieving the pressure with the temperature and pressure valve, just lift the metal lever until it stays open.
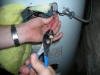
- Use a pipe cutter to cut the hot and cold lines to the tank. Place a bucket under to catch any water coming out.
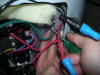
- Remove the electrical panel and test the wires for current with a volt meter (safety first). Disconnect the wires from the tank and keep the box connector for reuse. Pay attention to how they are connected for reference.
- Do not reuse the temperature and pressure relief valve or vacuum breaker from the old tank.
- Tip – A fridge cart will make the tank much easier to get out of the house.
Installing The New Hot Water Tank
-
 Begin by placing the new tank into position so that the drain and electrical panel will face an accessible direction.
 - Install the T&P valve (temperature and Pressure) and the bottom galvanized section of the dielectric unions using teflon tape on the threads of the hot and cold inlets and T&P valve.
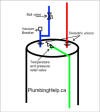
- Install the vacuum breaker on the cold line as shown in the diagram.
- *SAFETY* – Connect the discharge from the T&P valve using the same size pipe as the outlet and bring the pipe to within 6 inches of the floor.
- Reconnect all piping to the existing lines.
- Do not install a valve on the hot water line from the tank, this could cause an explosion if the tank ever malfunctioned while the valve was closed. See it on Mythbusters via YouTube.
- Open the electrical cover plate and and connect the wires. Marret the red to red, the black to black and the green wire to the metal frame of the tank.

- Fill the tank and check for leaks before powering up the hot water tank. You will have to open the T&P valve to release the air pressure while the tank fills.
- Turn on the power and wait for a well deserved hot shower.