How To replace a Moen Single Lever Shower Control Cartridge
 There are probably hundreds of different types of shower controls on the market so this “how to” will be of the generic type. The good news is, if your lucky enough to have a Moen or Delta shower control, the replacement cartridge will likely be free of charge since they come with a lifetime warranty. Just take your old cartridge with you to your local Moen or Delta reseller.
Tools That May Be Required
- Screw driver
- Allen keys
- Pliers
- Grease
Steps For Cartridge Removal
-
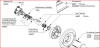 Have a look at this exploded view, although your particular shower control may be different the basic concept will be similar.
 - Insert a plug or cover the drain to prevent anything from falling down the drain.
- Start by removing the handle. To do this there will be a screw behind the cover plate or possibly an allen key under the handle.
- Now remove the cover plate by removing the screws.
- Before going any further check for water shut offs on the valve. If your model has shut offs they will be on both sides(hot and cold) and usually require a flat head screw driver to shut them off. If there is any doubt in your mind about it just shut off the water valves in your home or to the bathroom. Test that the water is shut off by pulling out on the end of the shower control (as if your turning on the shower)by reattaching the handle or with your pliers.
- Once your certain the water is shut off, remove the stop tube kit and place all the parts in a bag or somewhere you won’t lose them.
- There will likely be a retaining clip holding the cartridge into the valve housing. Use needle nose pliers to pull off the clip (pull straight up).
- Now you can pull out the shower control cartridge, which often is hard to do when its not working. Use pliers to pull it out(rotating helps) or you can rent/buy a cartridge puller.
- Take the shower control cartridge with you, either to the store you bought it from, or another reseller for replacement.
Installing The New Cartridge
- The new cartridge needs to be greased with plumbers grease if it doesn’t already have some on it.
- Insert the cartridge slowly and carefully so as not to damage the rubber grommets and O-rings.
- Replace the retaining clip, then replace the other components in the reverse order that you removed them.
- Turn back on the water and ensure that the hot water is on the proper side, if it isn’t you will have to remove the cartridge again and turn it 90 degrees.
- You may also have to adjust the limit stops (see diagram) to get the proper amount of hot water.