Replacing A Toilet Fill Valve
Don’t be afraid of this simple repair to replace a toilet fill valve, replacing a broken toilet fill valve or is a breeze. All you will need is a few household items and of course a new fill valve.
Tools You Will Need
- Adjustable pliers
- Bucket
- Sponge
- Scissors or knife
- FluidMaster fill valve
Click For A Larger Picture
Removing The Old Fill Valve
- Turn off water supply to the toilet with the valve located under the left side of the toilet.
- Flush and hold down the handle until all the water has drained out.
- Use a sponge and soak up all the remaining water in the toilet tank.
- Using an adjustable wrench disconnect the water supply from the bottom of the toilet tank.
- Remove the nut holding the fill valve in place from the bottom of the toilet tank. Place a bucket under it to catch any water you may have missed and dispose of the old fill valve.
Installing A New Fill Valve
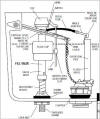
- Place the fill valve into the tank and adjust the height so that the critical height mark on the fill valve is an inch(1″) over the height of the overflow tube. (refer to image above)
- Tighten up the nut under the tank to hold the fill valve in place and seal the tank. Make sure the float assembly is away from the sides and can freely move up and down.
- Connect the water supply to the fill valve. This is often a good time to change the water supply tube for a new braided supply.
- Connect the refill tube and angle adapter so that it shoots water down the overflow tube. You will have to cut it size.
- Turn on the water and check for leaks around the new fill valve.
- Fine tune the water height using the water level adjustment clip and your done.


