 Whether your changing your bathtub or have a broken pipe it may be necessary to replace the drain and overflow, also called a waste and overflow. There are several types of pre-assembled drain and overflow kits available but I recommend using the twist and close type, as they are less prone to failure and are ascetically pleasing. Drain and overflow kits can be purchased in ABS, PVC, and brass. Other types of plug mechanisms include:
- Standard with chain and plug
- Lever type
- Push type
Installing a drain and overflow is a relatively simple project, however gaining access to it is not usually all that simple. You may have to remove sections of the wall behind the tub and the ceiling below it.
Tools And Materials You May Require
- Drain and overflow kit
- Glue/Primer (for the type of pipe)
- Screwdrivers
- Hacksaw
- Coupling
- Plumbers putty
- Wrenches
- Drywall knife
- Short length of pipe
- Measuring tape
- Marker or grease pencil
- PO wrench
Installing The Drain And Overflow
-
 Cut the existing drain just below the floor squarely using a hacksaw or pipe cutter if you have one and clean the burrs from inside the pipe.
 - Disconnect and remove the existing drain and overflow using a PO wrench and screwdriver.
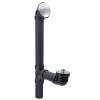
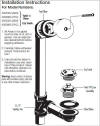
- Fit the new drain and overflow pieces together without using glue to make sure they fit the overflow and drain opening of the tub. If they don’t fit you will have to cut a piece to length using the same size and type of pipe. Follow the image above and make sure the Tee fitting is rolling downwards.
- When your satisfied that the shoe and the overflow elbows will match up with the holes in your tub it should be safe to glue them together (How to glue pipe). You can also mark the pipe just above the fittings to ensure they are fully seated when gluing the pieces together.
- When your ready to put in the drain assembly, place the rubber gasket on top of the shoe elbow underneath the tub.
- Put a small bead of plumbers putty around the underside of the chrome drain outlet.
- Tighten in the drain using a PO wrench until the plumbers putty squeezes out and its quite difficult to turn.
- Place the overflow gasket in with the fat side at the bottom. It also goes behind the tub and is drawn in tight to the tub by the screw or screws.
- Leak test the drain outlet for a couple minutes before putting in the plug assembly.
- After the plug is installed let the tub fill up and leak test the overflow. Install the trim and your done, but if you run into trouble you can ask for help on the forum.