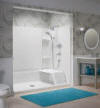
 Installing a standalone shower is becoming very popular in today’s modern, multi-bathroom homes. They come in a wide variety of sizes, colors and styles to fit any decor and are fairly cost effective to install. If this is a plumbing project your considering, have a read through this article.
Choosing the shower base
A standalone shower is typically sold in sections, with the base being one section and the doors or surround being the others. Although less commonly used in renovations, one piece shower units are available and care should be taken if you purchase one to ensure you’ll be able to actually fit the shower unit into the home/room. Plumbing wise however, only the base is really important as all the drainage and water supply measurements will be based off it.
Framing the shower walls
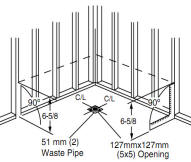
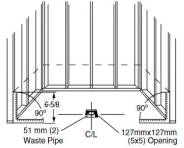
The shower base will require framed walls on two sides for neo-angle
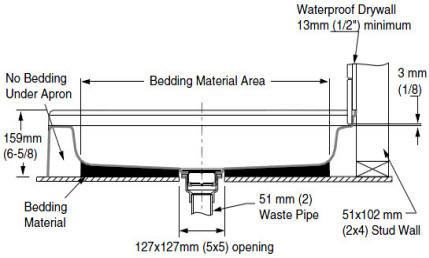
shower bases and on three sides for alcove type bases. The rough framed opening should be sized exactly to match the dimensions of the shower base you will be using, ensuring the walls are plumbed and square. Using the measurements provided with your shower base, cut an opening in the floor 5″x5″ where the center of the drain will be located.
Installing the Drain Outlet
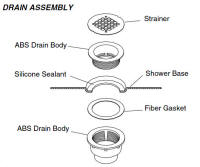 The shower base drain outlet will come in a few pieces that need to be installed so that it forms a water tight seal. A small bead of silicone sealant is applied around the recessed lip of the drain outlet to form a seal with the male threaded drain body. On the under side of the base, a fiber gasket will be used to allow the female threaded portion of the drain body to be tightened. Use a pipe wrench or a large pair of slip joint pliers to tighten the two pieces of the drain body together and remove any silicone that squishes out.
Installing the Shower’s Drainage
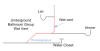
According to the Canadian Plumbing Code, your shower’s drain needs to be at least a minimum of 1-1/2″ diameter pipe but is usually roughed in with 2″ pipe (this the minimum by US codes), also the shower’s base will come with a 2″ outlet. Below you can see various illustrated methods of installing the drainage and venting for your shower depending on the existing drainage you plan to connect into. The shower’s drain that you install will require a minimum grade (slope) of 1/4″ per foot and can travel at that slope a maximum of 8 feet before the connection of a vent. The inlet of the 2″ p-trap should be directly under the opening in the floor and left unglued until your satisfied the outlet from the shower base will line up with the trap. The horizontal section of drain must also be secured using appropriate pipe hangers to prevent unwanted movement or sagging.
Typical wet vented bathroom group (click to enlarge) Underground wet vented shower (click to enlarge) Individually vented shower (click to enlarge) 

Leveling and Supporting the Shower Base
The shower base needs to be installed so that it’s level in both directions and firmly supported under the base. A low shrink dry mix mortar can be used as bedding material to support the floor area of the shower base as seen in the below image. Place the shower base onto the mortar mix and rock it back and forth until it’s firmly supported, leveled and the outside edge (called the apron) is contacting the rough floor. Secure top edge of the shower base using roofing nails at each stud.
Installing the shower control valve
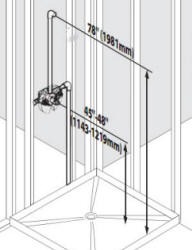 There are far to many different types of shower control valves on the market to give a detailed how-to that will encompass all of them; however, each control valve comes with a set of installation instructions that should be followed exactly. The recommended rough in heights for the control valve and shower head can be adjusted to suit your needs, if your taller than 6′ raising the shower head height would likely be much more comfortable. Some installation points that are not usually stressed enough are:
- Make sure there is firm backing placed behind the control valve and the winged back 90 (shower head fitting). The valve will be pushed, pulled and turned many times over its life and must be protected from any movement.
- Shower control valves are notorious for causing water hammer because of how quickly they can be turned off. Water hammer arrestors should be installed on the supplies.
- An access panel installed behind the control is not just convenient for service work but is actually required by code.