In this article you will learn the steps and plumbing information required to rough-in a toilet (water closet). Roughing in a toilet is not recommended for the average homeowner and should only be done by a licensed plumber; however, as long as you obtain a permit and have your work inspected, you should end up with a functional installation.
The standard 12″ rough-in measurement for toilets will accommodate 95% of the toilets on the market; however, there are many models available that require specific rough-in measurements. If you have a specific water closet in mind or space constraints that would not allow for a standard toilet, ensure you read the manufacture’s specifications and installation instructions first.
What You Will Need
- Plumbing permit and possibly a building permit
- A variety of plumbing and carpentry tools
- Pipe and fittings
Rules For Toilet Drains And Vents
- *Always check with your local plumbing authority before attempting any project yourself.
- The toilet flange and all downstream piping must be at least 3″ with no reduction in size.
- The trap arm of a toilet can only change direction by 225 degrees.
- A toilet’s drain must be run at 1/4″ per foot minimum grade when horizontal.
- A toilet cannot be installed upstream of any wet vented fixture.
- The maximum vertical fall of the drain is 1 meter(39 inches) and the maximum horizontal run is 3 meters before it connects to a vent.
- All downstream drainage after the connection of a third toilet on the same horizontal pipe must be 4″ diameter or larger.
- Toilets do not require a trap to be installed as they have an integral trap.
- If the toilet is going to be “Wet Vented” the portion of the pipe that is acting as both a drain and a vent must be at least 2″ in size but also depends on the number of fixtures(NPC – Table 2.5.2.1.) For a standard 4 piece bath a 2″ wet vent will suffice.
- A vent serving a toilet must be at least 1-1/2″
Planning The Drainage And Venting
-
 A toilet needs to have a 3″ drain, usually made of ABS or PVC and must be connected to an existing drainage stack, building drain or branch of at least 3″ in size. Depending on the age of your home, the existing drainage may be made of cast iron or copper pipe, which can be easily adapted to plastic pipe through the use of specialty fittings called “Fernco’s” (brand name), which is a rubber fitting with hose clamps.
 -
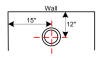 Plan where your fixtures are going to be located. The flange your toilet will mount onto needs to be 12 inches out from the wall(for a standard toilet) to the center of the flange and have at least 15 inches of clearance on the sides.
Toilet drainage rough-in steps
-
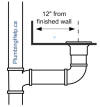 Cut a hole in the subfloor just large enough for the bottom part of the toilet flange to sit. The flange rim will be fastened to the finished floor later. The center of the toilet flange should be 12″ from the finished wall (add a 1/2″ for drywall if measuring from the framing).
 - If your installing the drainage underground, excavate the trench and have a supply of clean backfill ready (sand or gravel) to grade and cover the pipe.
- Cut in to an existing drainage branch or stack of at least 3″ in size and install a sanitary tee for vertical stacks or a wye on horizontal drains. Don’t forget to account for the grade of the toilet’s drain when measuring where to cut in. Ensure all plumbing fixtures connected to this drain are not used, or it could get messy. If any drain will be left open for a length of time you should plug it with rags or plastic to keep out the sewer gasses.
- Measure and cut pipe to required lengths and attach any fittings necessary without using any glue(dry fit). When dry fitting pipe and fittings, the pipe may not fully seat into the fitting, so don’t forget to account for this(this is called the fitting allowance).
- When you are satisfied that the pipe and fitting will give you the correct measurements and all the rules for your area have been met, you can start gluing. Work from the existing drain you are connecting to, outward grading any horizontal pipe at 1/4″ per foot. Note: Once the glue is applied, you have less than 30 seconds to seat the pipe in the fitting, and once it is properly seated, it will become almost impossible to remove after a few seconds. How to apply glue to pipe.
- Horizontal plastic pipe needs to be supported with hangers every 4 feet, as a minimum. The cheapest and easiest to use is metal strapping, which can be bought in rolls at any hardware store.
- The flange must be mounted so that the slots that will hold the toilet bolts are on
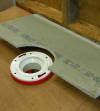 the sides of the flange as you face the wall.
 - When the pipe is in place and the toilet flange is set, the plumbing inspector will want to see your work before its covered over.
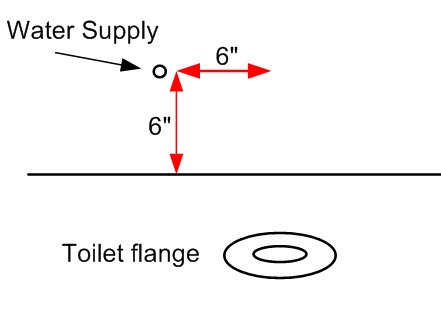
A standard tank type water closet requires a 1/2″ water line and isolation valve. There are two methods commonly used to bring the water supply to the toilet; in the wall, or up through the floor. The preferred and most aesthetic method is coming out of the wall, under the tank.
The water supply to the toilet should be located as illustrated in the image above, with the following measurements:
- 6 inches high – measured from the finished floor height
- 6 inches offset to the left of the flange(as you look at the wall)
When you are roughing in the water supply, ensure you secure the pipe with appropriate fasteners and leave enough pipe sticking out of the wall to be able to cut and install a valve onto the supply (normally done after the rear wall is finished).